Friday 15 May 2020

The negative consequences of higher optical power. [System magnification!]

 ~~

The higher the overall power [magnification] of your system the shallower the field of [sharp] view. This is a direct consequence of the equivalent focal length of the entire optical system. This demands you focus very carefully only on the subject which interests you.

Better a really sharp bird, or deer, against a softly focused background than vice versa! I was really shocked by this depth of field factor in my spotting 'scope despite my years of looking at terrestrial subjects though my various astronomical telescopes. A twig behind the one I focused on and the one in front of it, were both out of focus. Wind movement of a tree changed the point of sharpest focus. You see this same effect in images taken with long telephoto lenses. Photographers will deliberately use a longer lens and wider aperture to throw the background out of focus.

The field of view darkens to match the sheer power of the combined optical system. Larger aperture telescopes score better here. By providing enough light to capture an image at dusk or dawn. Or when the subject is in shadow. Smaller apertures may struggle under overcast conditions. Though the smaller telescope will be lighter and easier to carry to where you can capture your subject matter. The more light you can muster the shorter the exposure. Think about that as you read the last paragraph.

The field of view shrinks rapidly with increasing power. Handy if you want to capture a solitary subject. Less so if a distant flock or herd interests you. Worse if the subject is a bird flitting about foraging rather than static and singing. Which of a flock will you choose to focus on? At the cost of others having bits chopped off by the limited field of view. You may gain more by lowering the overall power and then carefully cropping the image later.

The higher the power the more that optical aberrations of the system are emphasized and misalignment exaggerated. Unless you have perfect optics and perfect alignment of the camera on the telescope the view may become softer. It might be tempting to use higher powers from a greater distance but you may get better results  by being closer and using lower powers. Even if it means walking further.

The physical demands in supporting the telescope and camera combination rigidly during an exposure becomes ever more critical as the power rises. This can be overcome to some extent by using the camera's self timer. Short zoom, compact digital cameras may not offer remote release. Though advances in electronics or more sophisticated cameras may provide this feature.  

Hopefully the usual 2 seconds delay will be enough for your chosen tripod to settle from your last touching the camera release button to set off the timer. A longer delay must be balanced against changing conditions and the bird having flown.

Another alternative is to use burst mode. That is taking a short burst of many exposures. You may capture an instant where vibrations were least annoying. Or the subject was most alluring. Wind is always a problem and will try to move the camera just when your subject is perfectly arranged in your camera's viewfinder screen. If the tree sways you may miss the tree let alone the bird.

It obviously pays to keep the magnification to the minimum you need to capture your subject at a reasonable scale. You gain all around. Greater depth of field. Larger field of view. More light to brighten your image and lower sensitivity to camera movement. Plus ++++ you shorten the exposure to freeze the image and kill any camera shake.

A very rough guide to magnification is to divide the focal length by 50. A 50mm lens on a 35mm camera is about normal 1:1 human sight. Or, you can multiply the magnification by 50 to get the equivalent focal length.

Lowest power = 27 x 50 = 1350mm! Zoom x2 and 50 x 50= 2500mm! Imagine handling a telephoto lens of that huge length in the woods or by the lake! It would require a massive support not to shake in the wind and would be totally impractical to carry around.

Now you know why you need to match your support to the magnification of your much smaller but highly magnifying digiscoping set-up. And why you should try to keep your system's magnification to a minimum.

~~

Camera alignment on the telescope for digiscoping.

~~

When a camera is first attached to the telescope it should be adjusted to be as close as possible to the eyepiece. Though the camera lens housing shouldn't actually touch the eye lens. Camera zoom lenses move in and out as they zoom and focus. The extreme length should just clear the eyepiece. Not actually touch it.

Do not attempt centering of the image until you are satisfied the camera lens will not hit the telescope eyepiece during zooming. Nor should you attempt to zoom to expand the dark corners out of sight on the camera screen. Use the lowest power on the telescope if it has a zoom ring.

A short, camera zoom lens will move in and out less than a super zoom. Though its [normally] free movement should not be blocked or impeded by the telescope. Actual contact is likely to produce an error notice from the camera. They are simply not designed to cope with this sort of problem. Nor do you want to damage the expensive eyepiece lens by crushing dust or dirt between the approachig surfaces.

The usual first view in the camera's viewing screen is of a bright circle with black corners. Whether the bright circle is centered on the screen will depend on the accuracy of the camera's fitting to the telescope adapter.

Trees at assorted distances over 450 yards away.

Adjustment is usually provided for back and forth, height and side to side movement. The telescope stays still. The camera is adjusted on its adapter to center its own lens on the telescope's eye lens. The viewing screen is useful for monitoring the exact alignment.

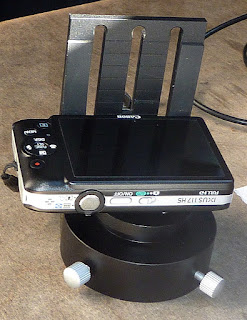
The problem is usually that adjusting involves loosening something. Which undoes any former adjustments. The Vortex PS-100 has a front plate which bolts to the slotted, L-section, camera support plate. A slot is provided in the front plate for the bolt to move up and down.

Rotation of the adapter front plate provides some side to side movement. Simultaneously with height adjustment. If that sounds fiddly, it certainly is. Patience and not torquing the fixing bolt too tightly is required. I added a thin washer beneath the hex, socket head bolt to allow smoother adjustment. Only when I was satisfied with centering did I properly tighten the bolt. I then carefully checked the camera's nose clearance from the telescope at all zoom settings.

If you cheat and zoom in to remove the dark corners, before the camera is properly aligned, you may get distorted pictures, false colours or shadows in your images. Patience will be rewarded so don't give up too soon. The Larch tree in my images was about 30 yards away. Zooming to remove the dark corners adds magnification to the power of the telescope. This is inevitable but not always desirable. See the next post on the subject of power in more detail.

~~

Viking Optical Tripod S'port Pt.2.

~~

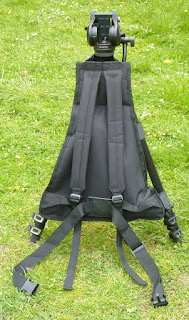
What I haven't shown [yet] is that the pack usually remains on the tripod in use. It does not impede the tripod when the legs are extended and spread wide. So that the whole unit works exactly like a "naked" tripod. The "bag" for want of a better term is made of sturdy cloth and the zips are typically modern plastic and seem like good quality. They slide open and closed smoothly as expected.

The hanging bag unit will increase wind resistance compared with a naked tripod. Though the whole tripod [and hanging bag] can then be rotated to minimize its area as presented to the prevailing wind. [i.e. Edge on to the wind.]

The tripod is probably best set up at full, normal height. Before the telescope in its zipped storage pouch is removed and fitted onto the head. This method will save grovelling on the damp ground. Since you an work at a comfortable height on a stable platform.

Somewhat surprisingly [for me] is that I haven't found any obvious flaws with this Viking tripod carrying system yet. Normally I start thinking about modification [or improvements] the moment a new item arrives in the post. The real proof of its true practicality will be in its actual use.

I am very pleased that I found less bulky, lighter and more practical way of carrying my big Manfrotto tripod into the wilds. I really don't think I could have put up with a real rucksack. With the tripod probably dangling form its side or strapped across the top. With the Viking S'port tripod carrying system the cloth always stays well off the ground. Nor do I need to crouch on one wet knee to access the contents. I just slip off the bag, loosen the clamps and let the tripod legs extend. What could possibly go wrong?  


~~

Yo-oh-heave-ho! The Viking Optical Tripod S'port MkII.

~~

Having accumulated all my bits and pieces I needed a way to drag it all around with me. My daily, rural walk are often over rough ground and only rarely on the flat. I climb up and down precipitous fire breaks. Often covered in brambles and furnished with twigs and branches usually just left lying where they fell from the jaws of the forestry harvesters.

I spent fruitless hours searching online for a suitable ruck sack. The main problem was carrying the long and fairly hefty tripod. I tried a couple of borrowed shoulder straps and liked that a lot better than a single one slung diagonally. So it would have to be a rucksack or something like it. Except that I neither wanted a rucksack nor needed one for my limited load.

Normally I am wearing a jacket with several pockets for my walks. TZ7 camera in the left front, hip pocket. Mobile phone inside left breast pocket. Tissues and reading glasses in my right hip pocket. Nikon 8x42 Monarch binoculars on my chest. Suspended from its short and modified strap around my neck. 

I looked at hundreds of rucksacks and camera bags. Nothing really jumped out at me. Nothing said "Burn more plastic!"  I returned to searching. The bird forums were discussing "Mule" packs and "Scope" bags and eventually the Viking Optical S'port tripod carrier.  This is a hybrid pouch which uses the tripod as its "rucksack" style frame. Clever. I liked that idea. The more cloth a bag has the heavier it becomes. They always want to cover them in pockets.

The S'port housed a central bag or pouch with pockets on the backside. The downside was that the online promotional video was of a black bag against a dark green jacket filmed on a horribly overcast day. Even when it wasn't being worn by the demonstrator the dark ground did it no favours. [I have deliberately lightened my images of the Viking S'port to bring out the detail.]

My most important question was whether the main storage pouch could manage hold my hefty, 85mm telescope? Rather than  wearing the 'scope mounted on the tripod head and turned across the wearer's shoulders. I decided it would. Or it could be modified somehow to do so.

I certainly wasn't happy about stumbling around in the forest carrying a modern day cross on my back! I placed my order with Viking in the UK and it took only a couple of days to arrive here in Denmark. I considered the modest £50 asking price [plus postage] to be perfectly acceptable if the quality matched the online images. You can pay hundreds for a telescope or camera bag if it has the desirable, "designer label!"

Thankfully the telescope fitted easily, but snugly into the main pouch and I am happy with my purchase so far. Though I have only trundled around the garden while wearing the whole "kit and caboodle" as a first test.

The arrangement of the telescope in the zipped storage compartment is vital for wearer comfort. The flattest possible arrangement is desirable to avoid lumps or sharp corners projecting into the wearer's back. Fortunately there was room for the telescope to be rotated into the best position for comfort. A flat board might be an idea to line the pouch where it rests against the wearer's back. We shall have to see how well the telescope rests in its "foetal position."

I removed the Vortex zoom eyepiece to aid stuffing/stowing it all away. It will be safely housed in its own, padded, "stay-on" case/bag for protection. As is the Vortex telescope's stay on bag  for the moment

The Vortex PS-100 camera adapter fits easily into the zipped, back pocket. I have plans to trim away most of the slotted camera plate. Or replace it with a simpler, aluminium angle profile. Though I will need to make a threaded hole for the front plate's, clamping bolt. No problem in that.

Note how the video head has been tilted well away from my head and locked securely in place. With the "joystick" turned down and locked alongside the central column.

Three wide, Velcro straps are provided for securing each leg to the "bag." The strap at the top is buckled and fits just below the head as the main securing method. The tension can be adjusted on the strap to allow the bag to fit tightly against the wearer's back. Or looser, to lean the whole pack away from them. Only the user can decide what works best for them in practice.

A further strap around the tripod's central pillar helps the cause of stability. For a load which does not jiggle or irritate the wearer in use. The two tripod legs, which act as the rucksack frame, can be spread wider. Or closed up together for best wearer comfort to personal taste. The legs pass the wearer's hips and the whole set-up feels very comfortable.

The third tripod leg, projecting at the back of the pack, provides instant [tripod] support when the wearer takes the pack off. When the pack is worn the leg lies flat against the pack. I found the shoulder straps worked fine at their shortest length. I'm about 5'10" and average build. A fully adjustable, waist band with modern, plastic, snap-in buckle provides the final touch for stability in use. The belt is long enough for a "beer belly" if required. I kept shortening it until it was snug.


~~

The Vortex PS-100 camera attachment.

~~

I had my telescope, my sturdy but lightweight[ish] tripod and my light[ish] fluid video head. What more could a fledgling wildlife digiscoper possibly want? What about something to hold the camera steady at the telescope eyepiece? I quickly made one out of two bits of aluminium angle profile but then got stuck. I had no easy way to connect it to the telescope.

More YouTube video watching, following links, reading identical sales websites and reviews later and I found lots of them were out of date. Everybody is now using their iPhone XYZ981 [or whatever.] Cameras are strictly "old hat."

Only I don't run, [nor run to] a smart phone. My tiny, ancient Nokia is more of a walky-talky when I have to be remote controlled by my lovely wife. The tiny screen can't even manage a full SMS text and I have only ever sent two messages myself. One of which said "No." I missed the lesson where typing 1k words per minute, with two thumbs, was shown to be essential to survival in 2020. My little Nokia has a camera but has hardly ever been fired in anger.

So I chose what I already knew. I'd use my little Canon Ixus117HS with its short zoom and myopic lens. Getting the Canon to play nicely with a spotting telescope was quite another matter. It has no filter thread on the lens. So that ruled out myriad, modern possibilities. 

I had to find something which held the camera firmly by its tripod bush in the base. Then something else to hold the base to the eyepiece. The old Vortex PS-100 appeared in several YT videos but they were years old. Nobody in Denmark listed them and Vortex discontinued sales of the device years ago.

A search online produced an example for sale in a specialist shop down in Holland. So I sacrificed more plastic to the bonfire of digiscoping vanity and placed an order online. The PS-100 arrived quickly enough but lacked any telescope adapter. Worse, it had a rather pointless 37mm female thread.

Cue more online searching. Nobody had a 37mm male to 57mm Ø female adapter for the Vortex Razor eyepiece. More searching! I discovered a shop practically just down the road which sold the PS-100. I could have cycled there in an hour, or so, but, alas, they listed no suitable telescope adapters.

As a keen amateur and imaging astronomer I am well aware of where to look for weird adapters. A UK camera shop on eBay sold a 37mm male to 42mm female threaded adapter. Now I just need to match the 42mm [T2] to a female 57-60mm adapter to go on the eyepiece. There was one in Germany.

I duly placed my order and, as if by magic, it shortly arrived in the post. That's four European countries to get where I needed to be. A fully operational PS-100 which actually fitted my little Canon. And, allowed it to be attached securely to my telescope! Whoopee! I was in business!

But not so fast! How was I going to carry all this lot as far as the nearest pond? Let alone survive an hour up to and around the forest and back in one piece? Note how much "excess baggage" that slotted base plate is carrying. That could easily be trimmed off to save a few grams/ounces. I have already added an ounce in borrowing a camera fixing screw from one of my old tripods. Somewhat strangely the PS-100's supplied camera clamping "knob" was far too large in diameter to let my camera move far enough forwards. It defeated the desired geometry of bringing the camera close to the telescopes' eyepiece.


~~ 

A fluid head to match: Manfrotto MVH500AH.

~~

My "retro" tripods had taught me that I needed a much better head than their ancient pan and tilt examples. They provided the ability to move a telescope or camera about but only crudely. With little finesse and far too much backlash. If you backed off any of the locks then the telescope just flopped over in that direction. 

There was no "half way" tightened where the friction was enough to allow a smooth movement. It was locked solid or nothing. Or completely floppy. With nothing [much] in between. Trying to move the telescope to point to a slightly different place and it jerked, overshot and completely lost the plot. Trying to follow a duck paddling steadily across the pond was an absolute nightmare!

It would be a real pain to use and make smooth video through the telescope almost impossible. None of these heads would transfer to the Manfrotto. Which was probably a good thing. More online homework later and I discovered fluid video heads. 

More particularly the Manfrotto 500 series. Each in the series more complex and certainly heavier than the last as the price per/lb, rises to match. I chose the simplest and lightest 500 model. If it was good enough for an internationally acclaimed wildlife photographer it was [probably] just good enough for me!

The Manfrotto 500 head, once fitted to the matching tripod is a revelation after decades of using the decades old pan-and-tilt heads in my rapidly aging collection. It is as smooth as one could desire and easily adjusted to provide any level of increased friction desired.

A preset counterbalancing force is provided if required. I found it best to adjust the extra long, sliding dovetail plate to balance the telescope. Stops are provided to prevent the telescope dovetail escaping the head's quick release clamp. A really sturdy and satisfying purchase for telescope use. It is light years ahead of my older kit.

~~


Telescope Support! Manfrotto MT055BDWCF tripod.

~~

Continuing my introduction to my own "proper" introduction to digiscoping. 

At 4lbs in weight an 85mm APO spotting 'scope needs firm support. I already owned several old tripods but they were all far too heavy to carry very far. Two different models went down the road [on different days] to the nearest lake/large pond just to see how they coped. Not well! Not well at all!

The 10lb Bogen "studio" tripod was far too heavy to contemplate carrying outside the garden. The smaller one "Benro" wasn't actually too bad to carry on a shoulder strap. It just lacked enough stiffness to rapidly damp vibrations when touched. Besides I didn't much like either of the pan and tilt heads under the Vortex. Both tripods are decades old and both bought secondhand.

What to do? It was obvious that a tripod was vitally necessary for stability. A shaking image was absolutely worthless even for visual use. Now add a camera for that minimum [and duly magnified] 27x [50x] and things quickly became just a bit silly. 

So I went in the opposite direction to heavy duty and invested in a Sirui P-326-EU, carbon fiber monopod. This was fine as far as physical telescope support and stiffness went but rocked freely from side to side in use. I was rapidly developing headaches and nausea! Particularly after half an hour of continuously watching a foraging bird of prey. As it covered a huge field next to my handy, pull-in spot on the verge.

So the monopod was relegated to lighter camera duties. Or as an adjustable walking stick if I live long enough to need one. Not that the Lumix TZ7 really cared. It has an excellent, image stabilization system. I haven't seen any sign of camera shake since I bought it new, years and many hundreds of thousands of snaps and video ago.

It was obvious [at least to me] that I needed a "proper" tripod. One which provided the necessary stiffness but wouldn't anchor me to my immediate surroundings like a sack of bricks. I wanted to take it on my daily walks! So carbon fiber was the obvious way to go. Above all it needed to have sufficient cross section in the legs to resist bending and torsion loads. 

Back to the Internet and countless YouTube and Amazon reviews later. The Vortex tripods had a good press but the legs were aluminium. That meant sacrificing either stiffness or weight. You can't have both. Or you must pay to have them together.

More hours of reviews and videos followed. It seemed I would have to pay a bit more for the necessary quality. No point in buying twice. I had tripods enough already for ordinary home & garden use.

I couldn't take the car on my rural walks just to carry a massive tripod. Many of the forest tracks I frequent are far too steep and inaccessible to cycling. I didn't want to add a mountain bike to my already long, shopping list!

Eventually I settled on the Manfrotto 055, with three leg extensions. Ideally, I wanted their 057 model, but only in theory. It was simply just too big and heavy for a septuagenarian to drag around the local woods and ponds on foot for an hour or more. Most of which is uphill or down dale and I really needed to keep it honest and practical. There was no point in fooling myself hat I could still manage a vast and heavy rucksack to be carried in the mountains of my youth.

By sheer luck Manfrotto offers a cut down "bird watching" version of the 055 in the sales area of northern Europe. The MT055BDWCF. Try saying that mouthful after a second pint at "The Lakeside Twitcher" pub!

This one looks roughly the same as the other models but lacks the fancy "Transformers" central column people [allegedly] use for Macro. A stubby, plain, central column model would save my back for those few extra yards/meters range. Probably while I am climbing or descending at 45° through the brambles of a rough, forest, fire break!

The tripod is everything I expected  and of superb quality and finish. I have to shorten the lowest leg section to reach the telescope eyepiece comfortably. Making the tripod even stiffer than normal. A lot of money but worth every penny for making its remarkable qualities practical at a weight which is just about acceptable.


~~

Finally putting it all together. An introduction.

~~

Friday 15th May 2020 Rather overcast with light showers and occasional sunshine.

I have been bird watching, rather informally, for many decades. Having lived mostly in rural surroundings, I was always exposed to birds in our own large, rural gardens, on my daily, rural walks and during my countless miles while cycling.

Various bird identification books were collected over the years. Though the Internet is often quicker if you know how to search. You also get lots more images to help to pin down the more obscure examples.

I have owned binoculars, of various qualities, for at least half a century. One of my other hobbies [or lifelong obsessions] is amateur astronomy and telescope making. So I have a very long history of handling a whole variety of optics and accessories and using them. Just as I have decades of experience in mechanical and constructional work of all kinds.

Much the same goes for photography. Digital photography became another daily passion and pastime. I have literally terabytes of my own images on numerous hard drives. Mostly taken with relatively inexpensive point and shoot cameras. Taken mostly with my aging Panasonic Lumix TZ7.

Or much less often by my tiny Canon Ixus117HS. The latter was bought primarily for afocal [snaps] photography through my various astronomical telescopes. [Aka: Digiscoping!]


A short zoom and relatively small lens aperture is highly desirable for this. Probably because the lens mostly closely matches the human eye. It avoids serious vignetting and the lens body doesn't physically move as far as longer reaching "super-zooms." The telescope provides all the power. The small camera captures what it sees through the eyepiece.

I still own a bag full of Olympus SLR bodies and Zuiko lenses [somewhere] but had absolutely no desire to drag that lot around the countryside. I usually take more images in a single week, with digital, than I often did in months on 35mm film. A morning walk can easily produce 50-70 images of local landscapes and wildlife. Albeit within the limitations of a 12x zoom Lumix P&S.

Therein lies the problem. I cannot "reach" distant deer, hares or birds without considerably scaling up my camera. While I have tried "afocal" photography through smaller astronomical telescopes, for many years, it was never ideal. The sheer length of achromatic, astronomical refractors made them totally unsuitable for taking on my daily walks in the gorgeous and highly varied Danish countryside. Even the modern, shorter, astronomical apochromats [APOs] are heavy and "unwieldy." They are designed to be used at a fixed location on a massive support. Not being dragged around the firebreaks of the local forest.

Comparison of telescope length without dewshields [sun shields.] 
My 85mm spotting scope matched against 90mm f/11 Vixen achromat. Not quite 1:3 in length but close enough.

The field of view through my astro telescopes was always very small and achromatic aberration [purple fringing] was always a drawback. So I decided to invest, for the first time in my life, in a "proper" spotting 'scope and support system.

After much online research I bought an 85mm of reputable, though not [allegedly] absolutely top flight optics. Swarovski and Zeiss are just far too rich for my tastes. At least not for a first try. My entire set-up has cost less than a single [smaller] Swarovski telescope. My larger aperture will provide shots where a smaller telescope will struggle for enough light. More light means shorter exposures!

So I went for a Vortex Razor II 27-60x, 85mm, angled eyepiece model. The views at 27x is stunningly clear and sharp compared to my astro refractors of similar or slightly larger aperture. Though it gets a bit softer with increasing power I am unlikely to need to use those powers for digiscoping. Or even for visual use. The wide angle eyepiece is great. Instead of "looking down a dark tube" at a bird, I feel as if I am magically brought nearer to the subject.

My tiny, Canon Ixus camera will be zoomed only just enough to rid the image of dark corners. Known as "vignetting." So the modest, minimum 27x of the telescope is already subject to the camera's own "magnification." I haven't checked [yet] but can [probably] safely assume at least 2x on the camera to be rid of vignetting. So the nominal 27x instantly becomes [say] 50x or more!

That's one hell of a long and hideously expensive, telephoto lens in monetary terms! Zoom both the camera and telescope and you can go well over 100x. The equivalent of several meters in focal length. Well beyond any available DSLR prime lens. The telescope is likely to be much lighter and far more compact than any prime lens of a fraction of the focal length.

~~