Tuesday 30 June 2020

30.06.2020 PH-20 Preventing telescope rotation on the camera plate.

 ~~

One, major problem I have found so far is the telescope [and attached camera] rotating around the fixing screw on the camera plate. I have tightened the [drop ring] thumbscrew as hard as finger tight will allow. Still the telescope objective springs half an inch from side to side. The camera even further due to the much greater "leverage."

The Kowa telescope foot and narrow ring may have some flexibility. Though I think the movement is mostly around the fixing screw. Probably due to the flexing of the rubber pads on the Sirui camera plate.

I am using the longer PH-180 plate for maximum freedom to slide the plate through the head for system balance. Ideally I need some means of restricting plate rotation. A small hole and a slot are provided in the Kowa's foot. Though the large diameter of the thumbscrew means these holes are largely inaccessible. The very shortness of the Kowa foot is another negative factor.

Manfrotto do an anti-twist clamping plate based on an L-shaped casting. The downside is the very small size relative to the very long mechanical system of telescope and camera. I can't just start drilling holes in the impeccable Kowa telescope body to fix something to the tube. So any restraint has to be fixed to the camera plate.

A curved 'crutch' to stop the tail end of the telescope body from moving sideways might work. The problem then is the stay-on bag getting in the way. A taller crutch could locate on the tubular body section at the tail end of the telescope. A right angle profile, in aluminium, is bolted to the rear end of the camera plate. Then a vertical crutch [plate with half round cut-out] is bolted to the angle piece.

Since this restraining 'prop' is fixed to the plate it will slide with the plate during balancing operations. A plastic plate would pass unnoticed in this position. I don't want to use aluminium for the upright plate. It would permanently mark the Kowa body black over time.

An hour later I had a prototype and it worked amazingly well! From half an inch of rubbery wobble, from side to side, to barely detectable movement.

Just a short length of scrap aluminium angle and an off-cut of kitchen cutting board. It needed a bit of inward bias on the angle to pull the crutch tightly into the tail end of the telescope. I have heavier sections of angle profile to make a much smarter and beefier job. That can come later if it proves to be worthwhile. There may be a flaw in the design somewhere which I haven't discovered yet.

I was delighted to see that I had colour matched the grey plastic to the Kowa "uniform." Quite by accident. It was that, or bright red! The scruffy bit of thin angle is hideous and must go!

~~

30.06.20 Sirui PH-20 Gimbal Head.

~~

As explained earlier I was very disattisfied with the Manfrotto 500 head for digiscoping. Only when absolutely level could it be considered neutral in balance. Though even that did not allow for balancing the telescope and camera system as a whole. Any deviation from level applied top heavy forces around the low level, altitude pivot. Causing the telescope to nose dive or the camera to sink. 

The further the angle [away from level] the greater the moment [mass x distance] around the pivot. The 500 head comes with a modest [built-in] reaction to out-of-balance forces. Which proved, in practice, to be incapable of limiting droop of the digiscoping system unless the axes were locked up hard. Or the telescope and camera were slid repeatedly and ever further through the head. An impossibility with the silly little camera plate provided. 

Which mean that trying to control the long and heavy, telescope and camera [see-saw] was a lost cause. I always had to be fighting the built-in droop. Which meant locked axes and an inability to smoothly follow any subject. At the high image magnifications involved this meant it was hopeless trying to capture a video.

Enter the geometric answer to my balancing nightmares: The Sirui H-20 Gimbal Head. 

The gimbal head can achieve a completely neutral balance of the digiscoping system in all planes once properly adjusted: It ensures the centre of mass [CofG] of the system is arranged at the centre point of the bearings.

First you balance the telescope and camera as a whole on the "swing." [See-saw style] By sliding the camera plate through the quick release clamp a point will be found where neither end of the telescope/camera system wants to sink. This vital step is best carried out with the vertical slide Q/R plate clamp at its lowest point on the vertical slide. Once balance is achieved you must tighten the clamp to fix the camera plate. Do not be tempted to alter it again or you will confuse the vertical balance operation. 

Once longitudinal balance is achieved, the whole optical system must be lifted gently to achieve vertical neutrality. This is done by gently loosening the vertical slide clamp while supporting the optical system.

I found it easiest to put my hand under the vertical slide plate to support it while my fist was wrapped around the curved arm. Small increments of vertical movement were then easier to achieve than trying to bodily lift the camera and telescope system directly.

If the telescope and camera are set too low then they will act just like a pendulum. Regardless of the starting point. They will try to reach the middle, or lowest point of the swing, and stay there

Lift the whole system too high and they become a Manfrotto 500 series head. Increasingly unstable when tilted away from perfectly level!

Vertical neutrality is easily tested by allowing the camera or telescope to point downwards in turn. The camera or telescope 'nose' should remain unmoving when either is pointed downwards. If they do want to sink then lower the optical system slightly.

A point will be found on the vertical adjustment scale where the whole system stays perfectly still once the axis knobs are released.  NO variation of this desirable state is permissible if you want to maximise enjoyment of the gimbal head. Panning and tilting to follow a subject then becomes almost effortless. Gimbal users refer to the camera and lens/telescope system becoming weightless.

Slacking off the axis clamp knobs completely should not only be possible but the ideal, default setting. Giving the telescope/camera unit a gentle shove at each end of the swing should show NO tendency to continue. Just as the system should not try to reach the middle of the swing either. It took me only a couple of minutes to achieve perfect balance neutrality from a standing start.

The PH-20 is silky smooth in movement in all directions. It stays perfectly still in any position. Just as it should be. I like the simplicity and understated, good looks. The scales are handy for remembering previous settings if you dismantle the optical system for transport.

The altitude clamping knob worked well, braking is progressive and locked the axis solidly when needed.

However, the horizontal panning axis brake/lock is a total disaster! The knob seems to tighten something into the teeth of a rather eccentric, finely toothed, rubber gearwheel! Making locking, from completely free, a sudden and extremely rough affair. Where is the graduated friction control expected of an expensive camera head? This is a Sirui gimbal! Not an Amazon knock-off at 1/3 the price!

If the knob is not fully tightened then the axis can still rock back and forth freely but over a small angle. Which is pretty weird! When most users would surely want a smooth braking effect on the axis. Followed by a gradually stiffer axis until full lock up is achieved.

How else would one pan to follow a subject smoothly? How can you frame a landscape if it cogs between impossibly large angles on a long lens or telescope? Is my gimbal factory defective?

Trying to unscrew the hex socket screw just resulted in the head unscrewing from the tripod. The underside has a metal socket for the tripod screw. This uses tiny pins on a proprietary pin wrench. I cannot imagine this is the route to examining the hidden components. I thought I might try to fix the problem rather than immediately returning it to the dealer for a replacement.

It seems I am not alone in disliking the roughness of the panning lock. The tilt friction is finely adjustable. Just as it should be. I am still hoping the panning will "break in" with a little exercise. The small hand knob needs serious torque to fully lock the axis now. 


~~


Monday 29 June 2020

29.06.2020 Testing-testing. Astro star diagonal in the TSN-884? Nope.

~~

In case anyone is interested, or even reading this: The Moon through the Kowa 88mm is superb! Sharper than my Vixen 90 astro 'scope and completely free of false colour fringing. I was easily able to use 96x with the 1.6x Kowa extender without loss of image quality. Very satisfying indeed!
 
The only downside was having to twist my neck to look upwards into the eyepiece. I suggest you choose the "bent" Kowa model [TSN-883] if you have any interest in astronomy.

I could have dug out a star diagonal for downward looking comfort and used my astro eyepieces. Though it would have meant a lot of fiddling about finding the Kowa 1.25" adapter in place of the zoom. I shall be better prepared next time. Now I know it is so well worthwhile I shall have the correct equipment to hand.

Sadly, it would not have helped. There is not enough inward focus on the Kowa '884 to allow a star diagonal to be used in the 1.25" adapter. I just tried and it would only focus at my feet and. Then only a yard, or two, further away at the other end of the available focus range.

Which is a shame. Because a star diagonal [elbow] makes it far more comfortable for astronomical viewing of objects high in the sky.

I tried my various Glass Path Correctors but they didn't help enough to reach focus at infinity with the 1.25" star diagonal. I should have bought the 'bent' model TSN-883.

Note that the single eyepieces I have tried can reach focus in the 1.25" adapter.

WARNING: NEVER LOOK AT THE SUN WITH ANY TELESCOPE NOR BINOCULARS WITHOUT FULLY APPROVED AND PROFESSIONALLY TESTED, SOLAR FILTRATION. INSTANT AND PERMANENT BLINDNESS IS EXTREMELY LIKELY!

~~

Saturday 27 June 2020

27.06.2020 Musings on yet another restart.

~~


Now I am waiting for the new DSN-PA7 adapter to arrive. Meanwhile I spent some time practising digiscoping on the sunlit, garden flowers. Fortunately I was able to shelter in the shade of a large tree as the temperature reached 82F.

Flowers are good for detail and discovering something about useful depth of field. These were mostly as near as I could get and remain within close focus. On the ponds I am often between one and two hundred yards away from my subjects.

I have been experimenting with the wireless shutter release v manual button pressing. Just to see if there is any obvious effect on image sharpness.

Perhaps I am ignoring the incredible image stabilization provided by the G9 camera? Because there isn't much difference to see. Almost regardless of my clumsiness when releasing the shutter. None of these images used fast shutter speeds. Quite the reverse. 1/150 - 1/200 second was average. F2.5 with ISO400 and Single Focus.

Interestingly, the "mirror-less" G9 camera shakes visibly even at the half press, wireless release. If one's hands were on the camera it might damp out this involuntary movement. When they are not, the screen shows a distinct  but rapidly damped wobble of the image on the camera screen.

After that discovery I was very careful to wait the extra second for the camera to still itself before finally taking the shot. A cynic might ask why several hundred pounds worth of Manfrotto's finest video support kit would be highly susceptible to such obvious shaking. It is only a mechanical, camera shutter, after all. Not a large hammer.

I have a potential solution to this problem on its way. Hopefully by early next week. Only my ignorance of such matters had me buying a Manfrotto 500 head in the first place. I saw a top wildlife photographer using one on YouTube. Presumably he is rewarded for promoting the product. As a base for digiscoping I would argue that it is a complete, non-starter. We shall see when its replacement arrives. When I shall be able to make valid comparisons from direct experience.

My launch into digiscoping was hampered primarily by wanting to severely limit expenditure. So I bought equipment which hindered any real progress. Resulting in some duplication and lots of wasted time. Albeit, valuable time spent on the beginner's slopes of the learning curve.

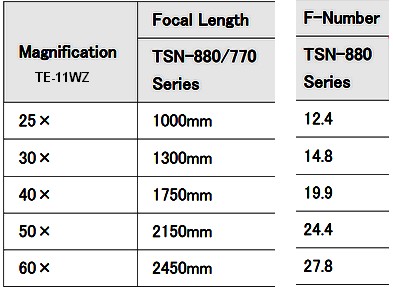
Fortunately the Vortex Razor 85mm was accepted back. To be replaced by the optically and mechanically exquisite, Kowa TSN-884. I can still use the other associated kit which I've bought, but for other purposes. It is certainly not money wasted. Just time wasted on unsuitable equipment. When I really wanted to forge ahead with enough sharp images to impress even myself.

I have had some fun but was deeply disappointed by my still images of distant water birds. As was my wife. Whom, like myself, was also expecting much more from me as a lifetime [very] amateur photographer. The real struggle was trying to keep the camera still enough at the foolishly long equivalent focal lengths of a digiscoping system. While it is possible to feed the birds it just seems like cheating somehow. I seriously doubt that Grebes would respond anyway.

Another early mistake I made was aiming for lightness in everything. I was originally intending to walk to the local ponds. That meant carrying literally everything I needed. A couple of miles there and back!

Fortunately, I quickly rediscovered that my touring tricycle was a handy, low impact way of getting about. No parking problems in narrow lanes.

It takes a fraction of the time to cycle there than it would have taken me to plod. Particularly  when well loaded down. Moreover, I was able to lighten my load by distributing stuff into my large, saddle bag. Even leaning forwards onto the "racing" handlebars made the tripod and telescope carrying bag seem almost weightless. I am still glad I bought the Viking Optical tripod carry bag.

I started off digiscoping using the tiny Canon Ixus117HS. Simply because that was what I had as my reserve camera. The problem was seeing anything useful on the tiny, heavily pixelated screen. I, quite literally, could not tell whether I was properly focused or not!

The Lumix G9 replaced the Ixus but at the cost of considerable extra weight, bulk and hideous expense. I calmed myself with the knowledge that I hadn't bought a decent camera in over 40 years. It was eleven years since I bought my Lumix TZ7! Which has gone literally everywhere with me whenever I left the house. Including travelling over 50,000 miles of cycling since I retired. The Lumix TZ7 has rewarded me with hundreds of thousands of images with very few disappointments. Other than a lack of reach for those more distant birds with "only" a 12x zoom. It is totally unsuitable for digiscoping though.

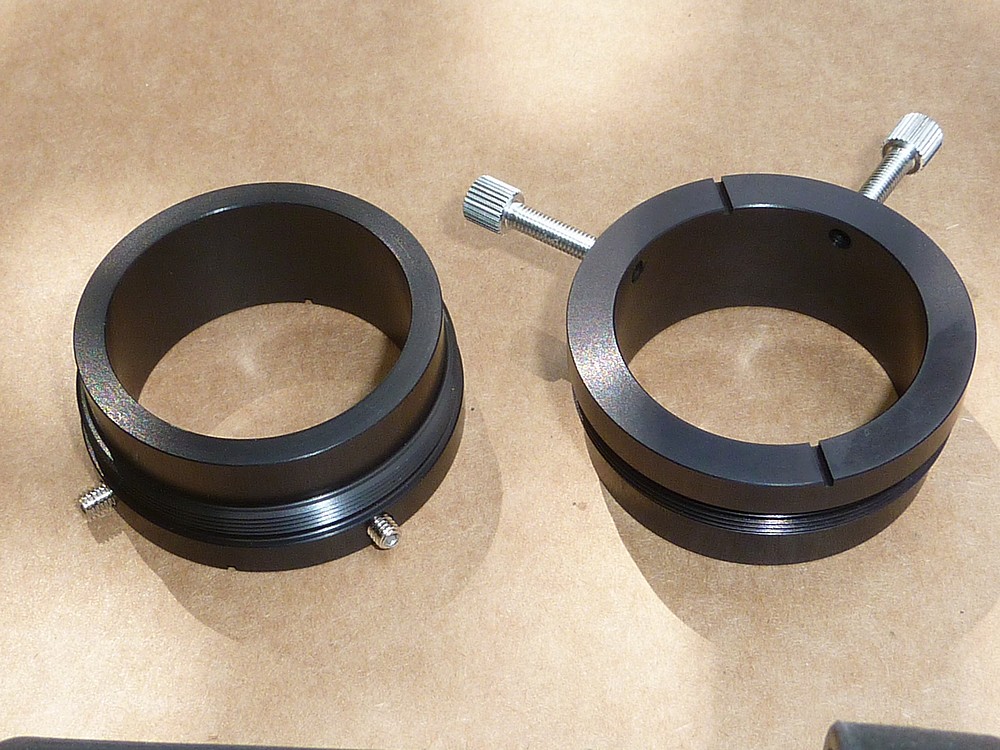
The new G9 camera needed very different support structures from the Ixus. Telescope adapters at this quality level are foolishly expensive for what they are. A lump of alloy run through a CNC machine and then anodized. It is certainly not rocket science. The trouble is they aren't easy things to copy with just any old lathe in the shed. The very fine threads are better made in a factory. Even at the cost of selling several, still useful kidneys.

I have spent a lifetime penny-pinching on my countless hobbies. Mostly by doing and making most things for myself. The taxman will only strip me of my modest savings whether I live or die.

Going into a home would be the same. Robbery with menaces. Just because I run a very old car to save money for better things. I haven't had a holiday away from home for 35 years. Being sensible with one's meagre income is not remotely rewarded. The world largely runs on debt.

The pandemic finally made me realise that my years are probably numbered. However fit and and active I pretend to be. Fortunately [?] we live in a tiny, detached rural hovel with a tiny mortgage. With almost no visitors and fewer neighbours. But plenty of big, garden trees and shrubs for the birds to play in.

Digiscoping rural ponds is a solitary pastime and all the better for it. Particularly in these very difficult times of social distancing. Which, ultimately, is probably why I chose to do it. I am not a great joiner and could never see myself standing in a row of digiscopers or twitchers beside a lake. Nice toys and my own company are fine by me. It is probably why I enjoyed cycling so much. Sharing a common interest online means it doesn't really matter where you live, nor why. 


~~

27.06.2020 Kowa TSN-PA7 digiscoping adapter.

~~

When I looked at the cost of the Sirui extended camera plate with adjustable camera support [possibly needing two of them for different heads!] I decided I could no longer resist the Kowa TSN-PA7. I really did not want to afford the high asking price to avoid encouraging them. Now it seems I have no option because of the mechanical problems with the Panasonic 20mm F:1.7 pancake lens in combination with the TSN-DA10.


ACCESSORIES | KOWA PROMINAR OFFICIAL WEB SITE TSN-PA7

The TSN-PA7 avoids using a camera lens altogether and bridges right over the TE-11WZ zoom eyepiece. Where it clamps to a ring threaded directly onto the telescope body. Two large cut-outs provide access to the eyepiece, zoom ring.

The camera end of the PA7 has a T2 thread to which an adapter ring must be added to match the bayonet of the camera body. A micro 4/3 mirror-less in my case of a Lumix DC-G9.

Removing the camera lens from the optical system reduces the number of optical components. Which should, in theory, offer improved optical performance. The open camera body is now looking straight into the eyepiece in an afocal layout.

One slight worry is that the camera body is open and unprotected from dust and debris. The PA7 offers physical protection to the camera once in place but not from airborne dust. A T2 disk with protective glass is available to close off the camera opening. The T2 - bayonet ring would then be left in place to maintain the seal when a normal camera lens is not fitted to the body. A bulb lens blower will be my friend.

Another hurdle with the PA7 is that the camera body won't see any lens. Since none is fitted. Can the camera body autofocus without a lens? I would guess not but hopefully the excellent image stabilization in the body will still work.

Focusing will have to be entirely on the telescope. It is really just a super-telephoto lens after all. Though there will be no electrical contacts for the camera to read. Some experts have said that camera focusing should always be set to manual when digiscoping. Even when a pancake lens is fitted. I tried manual focusing with the 20mm lens in place and didn't much like the format compared to auto. Just something else to get used to I suppose.

I just hope the camera isn't going to ask for the focal length every single time I zoom the telescope. As it did when I experimentally removed the pancake lens. I suppose it needs this information for the image stabilisation to work properly. At least I could get a picture in the camera viewfinder by hovering just behind the telescope without a lens.

All will be laid bare when the new parts arrive in the post. Yet again the weekend has intervened. Not that it matters after two days of heavy cloud and the odd shower. Bright sunshine definitely helps with such slow, lens systems. See the telescope manufacturer's own table above right.

~~

Thursday 25 June 2020

25.06.2020 CF Digiscoping camera support bracket. Pt:4.

~~

I have cut a full length 50mm wide strip off the 340x150mm CF plate. A single strip still feels remarkably stiff in bending. I am now thinking about measurement of the effect of this cantilevered "leaf spring." The load on the free end is now about 2lbs. The intention is to compensate for much of the load on the pancake lens. An upward force is required on the free end of the cantilever to "lighten the load." 

If I set a block on each side of the leaf spring then I can place the digital scales on the blocks. Two further blocks will be placed on the scales to support the base of the camera. The load measured by the scales should reduce as I add packing between the camera base and the free end of the leaf spring. There is no need to use the camera itself. It just needs a similar weight to replace it. I used scrap timber blocks.

The bridging idea worked fine with the scales. The problem was that I had overestimated the stiffness of the CF. It took all three strips of 50mm x 2mm to achieve full upwards offset of the camera load. Otherwise the strips sagged too much. Three strips allowed an 18mm high block to completely neutralize the camera load.

Three strips, clamped firmly together only at one end, are not a true comparison with a single beam of full 6mm thickness. The combined stiffness could be increased if I epoxy the strips together, as laminations. I shall leave the CF strips untouched until I get the longer camera plate tomorrow. No point in drilling holes unnecessarily. A longer camera plate might offer a completely different insight.

The longer plate is just a bit longer. I decided to stop trying to be clever with leaf springs and make a rigid strip to support the camera. So now I have glued all three strips together to produce a single strip 340mm long x 50mm wide x 6mm thick.

Presently being pressed in the jaws of a B&D workbench. The new strip will be bolted at both ends. So will not suffer serious shearing forces between the laminations. The load being supported is also rather trivial. I just wanted to save weight over a solid strip of aluminium.

The images shows the results of laminating the three CF strips together. It is a long way from the telescope foot to the camera base. The short [standard] Manfrotto plate won't add very much support. The Manfrotto plate is clamping the CF strip between itself and the Kowa foot.

In fact the support was now adequate but I had discovered another problem. The short cable between the wireless receiver and the camera can get trapped behind the pancake lens. I kept clicking away thinking the camera was still not happy with its support. The shutter kept refusing to go off. Once I cleared the cable from the lens there were no more problems with releasing the shutter. Nor were there any more grinding noises.

Whoah! Sirui makes a range of adjustable, long lens, support plates/ brackets/ rails to suit different tripod heads. This is exactly what I need to support the G9 camera base. They even do one for Manfrotto heads: The VH-350. Their own heads need a TY-350.

Now I wonder whether the camera support system can go low enough. If not, I can add packing under the telescope foot. Except that these long, camera rails aren't a stock item at Danish camera shops.

But see the next exciting episode:


~~

25.06.2020. CF Digiscoping camera support bracket: Pt.3.

 ~~

An interesting possibility has occurred to me. The Panasonic BGG9 battery grip is almost the correct height to act as the necessary riser. Give or take an odd millimetre here or there. I already have a spare battery which I charge and recycle through the G9. That way both batteries are regularly exercised. Far better than leaving one untouched and constantly recharging only one.

The BGG9 has a tripod mounting hole underneath ready for the bracket retaining screw. If I need to make up height more over the BGG9 I can easily add Teflon spacers to support the camera base.

This will ensure the camera base can slide effortlessly on the CF plate. While allowing me to easily add more height if the lens needs more upwards bias to help unload the weight of the camera on the pancake lens mechanism.

I was already considering the battery grip to extend my digiscoping sessions with the reserve battery. Though changing batteries is hardly a chore, it does require access to the underside of the camera. Such fiddling, while standing in knee length grass is not ideal. Luckily I have found a dealer offering a heavily discounted example online. It should be here tomorrow.

Next day: The battery grip has arrived thanks to the dealer and the Danish postal service. I have arrowed the new image with the battery grip in place. On the left, the telescope foot is tipped up at the front. The camera is obviously too low, relative to the telescope and must be lifted slightly.

I  now realize that it might be possible to fix the camera firmly. Then have the lens trombone [or telescope] inside the DA-10 adapter. The linear lens movement [when focusing] is about 4mm. [Arrowed]

The DA-10 provides a wide, internal groove for this potential but only if the camera is properly supported. No doubt this is how the rigid, PS1 arm/bracket was supposed to function in combination with the DA-10 adapter.

The lens must obviously be placed a certain distance within the DA-10. This will avoid "hitting the buffers" during focusing. Only then can the camera be safely clamped to the supporting bracket.

For the rest of this [supporting bracket] project I shall proceed with the fixed camera arrangement unless it proves unworkable in practice. Now I just need to find the height of enough packing under the camera to unload the lens from most of the weight of the camera.

See new image [above right] with the telescope foot now level thanks to the 4mm packing under the battery grip. Until I can clamp the new [longer] camera plate to the CF and the telescope foot, I shan't know how much packing I really need. I have used a strip of 4mm, self-adhesive rubber for packing. Ideal for ensuring a slip free hold on the camera [grip] base.

It is fortunate that the CF [carbon fibre] plate is just the right length to reach from the telescope's foot to the camera base. Until I receive the longer camera plate [on order] I cannot determine where the holes need to be drilled in the carbon fibre. Nor have I yet decided how wide to cut a suitable strip from the CF plate. I can always epoxy laminate two layers of CF together if need be. Though the CF is amazingly stiff and very unlikely to need be any thicker.

Perhaps I ought to proceed with a trial bracket using the present camera plate. I'm trying to think how I can use my platform digital scales to measure the weight compensation. How can I measure the upward spring effect of the carbon fibre plate by changing the packing thickness under the camera base? I could try clamping the strip of CF to see.

Whoops! The camera shop has just this moment confirmed despatch of the longer camera plate. What a strange coincidence! 😊


~~

Wednesday 24 June 2020

24.06.2020 CF Digiscoping camera support bracket Pt.2.

~~


The CF plate can only be fixed on top of the tripod's camera plate. Where it will be sandwiched by the Kowa telescope's foot. If the CF was fitted underneath the plate it will lift it and make it impossible to fit the dovetail in the tripod head. Tripod plates have specific profiles on their edges. To match the machining of the tripod head.

Some plates, like Manfrotto's 500PLONG, are not even symmetrical on opposite edges. This is to provide extra security for the quick release catch. Which allows the plate to be simply dropped into place into the dovetail, head groove, from above. A thumbscrew then secures the camera against for and aft sliding. Security pins prevent the camera plate from escaping the head groove altogether.

I have ordered a meter length of UNC 1/4" x 20 threaded rod/studding/all thread in stainless steel. This will allow me to attach the camera to my planned CF support bracket regardless of the final thickness/height of the riser.

I keep wondering if I can clamp the cameras to my intended bracket and still have the pancake lens focus freely. Any linear movement during focusing will result in binding in the lens if the camera base is firmly clamped. Though, in practice, there is no need for the camera to be clamped tight to my DIY support bracket.

The camera's weight is merely resting on the bracket to reduce the load on the lens mechanism. The camera is restrained by the DA-10 adapter so it can't move sideways. So I just need a slot for the tripod fixing screw rather than a round hole. This will allow the camera body to slide freely on the bracket support plate.

I have just placed the camera "nose down" on the 20mm F1.7 pancake lens with the DA-10 adapter attached. When the shutter was wirelessly released, to focus, the whole camera rose and then sank back down. Say about 6mm of linear movement by eye.

There is obviously a serious conflict here between adequate camera support and normal lens function. Some dealers say the Kowa PS1 support bracket is discontinued. This may well be the reason why.

But read on to the next exciting post: 😉

~~

24.06.20 Wireless shutter release.

~~~

Wednesday 24th. The ongoing problem with digiscoping is camera/system shake. Releasing the shutter manually is bound to move the camera. The camera's image stabilization system is not really designed for tripod mounted telescopes with ridiculously long focal lengths. Though it might well have a try. Some "YT experts even suggest switching off IS for tripod work. Otherwise the IS may cause image flutter.

I chose another route. Instead of paying through the nose for a Panasonic wired shutter release, I bought a wireless shutter release instead. A Pixel Oppilas unit via Amazon. With an excellent reputation these units cost about £30 including postage from the UK. Only later did I discover that they were available from some Danish dealers.

Once I had fitted a fresh pair of AAA batteries in each unit I was up and running. The only problem was a "hair trigger" on the shutter release button. Searching online quickly produced a solution on a photography forum.

Switch off "Half way shutter release" in the G9 menus. After that, a half press of the remote button was more reliable than a manual press on the camera's own "hair trigger" shutter release button. Success! Several tests indoors and out, showed effortless wireless range up to 15 yards. I'd need binoculars to see the shutter action from any further away.

I have tried Panasonic's Image app on my Lenovo tablet but it couldn't lock onto the camera.  Though I had far more luck on the TV and was soon watching my grebe videos direct from the camera.

~~

Tuesday 23 June 2020

3.06.2020 CF digiscoping camera support bracket. Pt.1.


 ~~

I have ordered a plate of carbon fibre from a model shop to make an extended camera support bracket. Like that available from Kowa. CF sheet is lighter and stiffer than the same dimensions in aluminium.

The plate has arrived and is incredibly stiff and light! It rings like a metal plate when struck. The sheet is 2mm thick and 340mm x 150mm. More than enough to make several camera support brackets.

I was going to order a 3mm sheet but even 1mm thickness might easily have done the job. A 1.5lb camera is hardly Olympic weight lifting! CF is very attractive as a material for this purpose. It is "camera" black and doesn't weather like bare aluminium. It will not add much weight of its own. The cost was about £30 equivalent including overnight P&P. The TSN-PS1 cost nearly £200 equivalent!

The difference in height of the telescope foot and the base of the camera must be allowed for. An upward spring bias will probably help to relieve more of the weight of the camera body on the pancake lens mechanism. This can be achieved with a suitable spacer. I already have an extended, camera base plate on order. So shall see if I can't add the CF extender to that. The new plate may be completely different from the very short one which was supplied with the Manfrotto 500 head.

The balance of the digiscoping system is already tail heavy. This is thanks to the considerable weight of the G9 camera on the far end of the Kowa DA10 adapter system and zoom eyepiece. So I shall have to keep the weight of my extending support bracket as low as possible. Or, slide the whole system forwards in the head. Which I obviously can't do with the standard camera plate.

From a quick measurement there is a difference of 55mm between the levels of the underside of the telescope foot and the camera base. I have some rectangular section aluminium tube which may be suitable as a lightweight 'riser' to match the difference in levels. 4mm of plate must be subtracted from the 50mm dimension to allow for two plate thicknesses.

I have no plans to make a copy of the PS1. There is really no need to try. A simple pair of CF strips, joined by the rectangular tube, as a riser, is all that is required. I am aiming for an upwards spring force to take most of the weight of the camera off the pancake lens. The telescope foot will rest on the CF where it fits over the tripod/camera plate. CF cannot be thermally bent to shape. At least not safely. It will want to return to its previous flatness if warmed. CF absorbs the sun's heat to become hot to the touch!

The bracket must not get in the way of normal digiscoping operations. So the spacer/riser tube cannot just go wherever it likes. Note from the image how the [deliberately placed] timber block would interfere with free access to the telescope's zoom ring and adapter thumbscrew. So this area must be avoided for the riser.

The aluminium riser [tube] is about 6mm short of enough height. The piece of ply under the camera is 10mm thick. So 10 - 4mm = 6mm. The 4mm represents two layers of  CF plate. Perhaps I can find a taller riser?  Or add some invisible packing somewhere to make up the difference.

A positive upward bias will best be achieved by altering the riser height. Or two risers can be used to produce a double stepped bracket. Placing a riser directly under the camera base would require a very long fixing screw for the camera's tripod bush.


~~

Sunday 21 June 2020

21.06.2020 Summarising recent [slow] progress.

 ~~

At this stage I am inevitably wondering if a Leica-Lumix 100-400mm zoom lens would not have been more "instantly gratifying" in providing better images almost from scratch. Though the long focus lens probably lacks the incredible "reach" of the digiscoping system to bring the very distant birds much closer. 100-400 with 4/3 [x2 crop factor] is 200-800mm equivalent in 35mm camera terms. Digiscoping can easily double that. Though with considerable, added complexity and moment arm. Many professionals can use these long lenses and even digiscoping telescopes handheld! 

My age does not bode well for memorizing all the G9's menus in only a few short hours. I might print out the menus to save wasted time button pressing and failing to achieve my purpose first time. There is also the struggle in my seeing the tiny viewing screen and symbols. Which require my strongest reading glasses. Though, fortunately, I find the G9 viewfinder is much easier to use.

During today's digiscoping session I was often seeing much sharper images in the viewfinder than I actually captured. Particularly at the 60x power on the Kowa. Which was necessary to give useful size to birds near the distant shores. I must assume my images are suffering from camera shake from manually depressing the shutter. While remote shutter release is easily achieved it does not make the birds sit still for long. So some panning and tilting is inevitable.

Printing out the G9 menus at a suitably large size, for rapid reading legibility, will provide ready reference material. Without needing any glasses at all. Experts will confirm that practice is 90% of achieving any real skill. "Beginners luck" is only ever intended to encourage the wannabe expert. If it were too easy it would not be worth doing and everybody would become an expert overnight.

There is a [so called] 10,000 hour rule to achieve full expertise. However that equates to four years of full time activity. Listening to professional wildlife photographers on their YT videos convinced me that most of them are highly intelligent. That most of them have studied their chosen "prey" and delved deeply into all aspects of their craft. Most of them have "high end" equipment and know it inside out. However, is certainly not that alone which provides the stunning images they capture. Their choice of equipment does not hinder the application of their skills.

There is so much which goes unspoken because they have stopped thinking about it. One can still learn much from their commentaries. The direction of the sun, the wind direction. The time of day. Is the tide coming in or going out? Learning all the varieties and names of their quarry. There are so many factors which have to be absorbed just to achieve basic competence.

Then there are the years of practice at swinging large lenses manually to capture birds in flight. The long and antisocial hours just waiting for something to appear. Learning the habits of their subjects. Which many amateurs would avoid for themselves. Simply because it is too much trouble and they can always rely on luck. Or a tip-off about a rare sighting on the grapevine.

While the Manfrotto 055 tripod is quite stiff it is asking a lot for it to cope with the magnifications [equivalent focal length] of digiscoping. In 4/3 camera terms using the pancake 20mm then 25x = 1000mm. While 60x = 2400mm. These figures are taken from Kowa's own digiscoping website.

These extreme focal lengths are not usable without taking great care to avoid system movement during the exposure. Very fast shutter speeds are highly desirable. Except that the telescope/camera system will struggle to achieve these. The aperture/equivalent focal length will make for a relatively "slow" system. 1000/88 = f:11.4. 2400/88 = f:27!  There is no free lunch. Raising the ISO helps and is vital to obtaining faster shutter speeds. Rigidity of the support system is vital. Cable or wireless release can help if the subject is stationary.

Remember that depth of field is also poor at extreme focal lengths. Though this depends on distance. Some birds stay still. Lots more don't. I have discovered to my cost [in poor results] that even a dozing and floating bird is rarely still. They drift on the slightest breeze. With the inevitably small field of view the bird rapidly moves completely out of sight unless you pan. Which means you can't lock down the tripod head in the vain hope of greater stiffness. I kept trying that and then needed to pan and tilt to follow a drifting bird.

One of the advantages of digiscoping is the [usually] considerable distance between yourself and your subject matter. So they are much less likely to be nervous and fly [or run] off as a result. My local Grebe has the habit of vanishing underwater in an instant. Usually without the slightest sign of preparation for an extended dive.

Waiting until the bird presents a pleasing pose is usually a lost cause. The diving obviously takes a toll on its plumage. So it spends time preening. The resulting contortions are rather unlikely to make attractive stills. Though video is far more forgiving and even quite entertaining.

As I packed up all my kit, to cycle home, I noticed the curious ducks and grebes had come to see what was happening. None of them had come near the shore while I was standing behind my tripod. Typical! 😊


~~

21.06.2020 Grebes, shelducks and camera problems.

~~

Sunday 21st June. First outing with the Kowa 884 'scope and Lumix G9. I had the Lumix 20mm F1.7 'pancake' lens on the camera. With the Kowa DA-10 digiscoping adapter on the 12-60x Kowa zoom eyepiece to join it all together.  

The initial problem was not pushing the DA-10 adapter together firmly enough. There is some leeway thanks to the broad groove inside the outer barrel. So that I had vignetting of the first few images. Once discovered, I pushed the DA-10 fully together and this raised another problem. 

The 20mm lens is not completely static in operation. It actually telescopes/trombones slightly during an auto exposure. This may have caused the G9 shutter to refuse to operate after [say] half a dozen exposures. The shutter button simply did not respond. So that I had to turn the camera off to reset it. Then it was good for another half a dozen snaps before refusing a shutter press again. Just occasionally there was a rough sounding buzz. Suggesting a stepper motor struggling or stalling somewhere.

Setting the camera to Manual focusing did not help. I was adjusting the 20mm focus ring but the camera shutter still stalled after another half dozen shots. Could there be a mechanical clearance problem within the Kowa DA-10?

Standing in long grass under a shady tree beside a small lake is not the ideal place to be checking clearances. The sound and the odd refusal might have been the result of how I was holding the camera.

Or how I was resting my hands on it to reach the shutter. This might have put strain on the 20mm focusing mechanism by increasing friction above the mechanically tolerable level. I have seen digiscopers using a long, camera plate extension. This reached right back to the underside of the camera body to provide extra support at the tripod bush. Not a difficult task to whip one up out of scrap aluminium to see if it helps.

It certainly isn't normal to hang a heavy camera, like the G9, from its lens, filter thread. The image shows the Kowa TSN-PS1 camera support bracket for their straight-through 'scopes. Now shown as discontinued by some dealers. Kowa pricey in those still with stock. A similar support device is easily copied in aluminium [or carbon fiber?] to take most of the camera's weight off the pancake lens. 

Despite all these setbacks and frustrations I still captured 204 more images and some videos. The grebe at the top was one of today's first and the best of my captures so far. Probably 60 yards away at the time. Though the image was heavily vignetted just behind the bird. Fortunately I was able to crop the original images down to 2000 pixels and then resize further for the blog. I usually post images at 1000 or 1200 pixels maximum. [3:4 or 16:9 respectively.]

I have years of very basic, image processing experience for my blogs. For which I still use PhotoFiltre7 to crop and resize.

Many of my other images today were poor to below average. I see this as all part of the steep learning curve. Both the new camera and the new telescope need much more familiarization before I will feel fully comfortable at operating them to a sufficiently high standard on "auto pilot."

The Kowa '884 is stunningly sharp and clear when used visually. It never fails to delight at the incredible purity of its images. Similarly, my ageing Nikon Monarch 5 binoculars truly excelled in today's brightly sunlit conditions on the lake.

The clarity and sense of depth and immersion in the scene was almost magical. I have found the Nikon supplied, bino-bag. Which was put away as unnecessary for my usual walks. So now I can carry the binoculars safely in my saddle bag without worrying about capping the lenses.

This was one of my average images of a 100 yard distant Shelduck. A pair with young were cruising up and down near the opposite shore. The sun was in completely the wrong direction for most of the time. With their faces in deep shadow. Just occasionally they would turn round to check their chicks which were following the adults.

The Lumix G9 is still only a few days from arriving in the post. A superb camera in the right hands. Though mine are still fumbling, despite having watched dozens of YT videos on the camera and its settings and use.

I am already up to 1300 images after only three days of intensive familiarization. Mostly landscapes and garden shots to try out the complex settings.


~~

21.06.2020 Video head basic design problems.

 ~~

The weight of the camera needs the whole digiscoping system shifting forwards to achieve balance. Making the standard, Manfrotto, sliding plate look very silly indeed. I already have a longer plate on order after messing up by ordering a 357PLONG which didn't fit the Manfrotto 500 head!

The new plate will not be a Manfrotto. In fact the whole concept of the "video" head is a complete non-starter. Except [possibly] for a modest camera body and short lens. iue.e One which remains well within the very limited capacity of the fluid drag system.

This very silly design places ALL of the camera system mass well above the pivot. Which is way down at the bottom. Where the bright red ring rudely pokes its tongue out at its deluded buyers. Like myself. I should never have encouraged them by actually purchasing one of these heads for digiscoping!

The very low pivot accentuates any imbalance by causing droop at the front or rear. Adding "fluid" damping is just the manufacturer cynically admitting the whole design is simply crap.

The mass, deliberately arranged so far above the pivot, acts as an inverted pendulum. You could add long, vertical arms with counterweights sited well below the pivot. Except that nobody [sensible] wants the extra weight, bulk and complication to carry around. There is only one place where a vertical pivot will work without constantly changing balance issues. That is at the centre of gravity of the entire system within the small upper [red] ring.

The drawing over the image shows the problem. Any imbalance is amplified by the poor sighting of the low, vertical axis or pivot point. The small upper ring shows where the centre of gravity of the system resides. The large ring shows how the high centre of mass rotates around the very low pivot. As soon as the telescope system, or long lens, exceeds the tipping point it immediately does a nose dive!

In a digiscoping system even the control arm works against the user!  It adds mass on the wrong end of the long lever of moment. [Mass x distance from the pivot] I could achieve better balance if I moved the arm to the front! Where is is foolishly unreachable. I could obtain even better balance if I added a lead weight to the far end of the arm! Even the arm itself is an open admission that this design of video head is crap unless you are supporting only a small camera body and short lens.

~~

Thursday 18 June 2020

18.02.20 Kowa DA-10, camera to eyepiece adapter.

~~

The DA-10 inner barrel screws onto the Kowa zoom eyepiece in place of the rubber eye cap. The latter simply unscrews to expose a fine thread.

An adapter ring must match the filter thread of the camera lens to the DA-10 outer barrel. I chose to use a 20mm f1.7 'pancake' lens with 46mm ring on my Lumix G9. The camera's amplification factor is close enough to neutral with a 20mm lens and 22mm sensor diagonal.

The view inside the DA-10 shows the Lumix lens. The DA-10 is beautifully made and well thought out. It even has a rubber moulding on the inner barrel to protect the eyepiece. While providing better support and ideal friction when rotating the camera between portrait and landscape orientation.

A large thumb wheel runs in a groove in the inner barrel to allow rotation without the risk of falling apart.

This image shows the zoom eyepiece with the inner barrel screwed into place. The inner barrel replaces the rubber eye cap. A rubber ring is provided for user comfort to avoid direct contact with metal when using the telescope visually.

The advantage of this arrangement is the ease with which the camera can be removed. To allow the user to look through the telescope. The accuracy of placing one barrel over another ensures perfect alignment of camera and telescope without repeated adjustment. I could never get the Ixus 117HS camera perfectly central on the PS-100. 

The camera feels very secure once the adapter is in place. Any sign of camera droop is purely imaginary or the result of my poor photography.  Or, quite possibly,  barrel distortion on the TZ7 12x zoom lens.

There was absolutely no sign of vignetting using the 20mm lens at any zoom power on the Kowa 25-60 zoom eyepiece. Sharp focus snaps into place on the Kowa focusing knobs.


~~


Tuesday 16 June 2020

16.06.2020 Desperately needed practice on the lake.

~~

Tuesday 16th. Max 75F. A long, warm and sunny day. Off to the lake to practice digiscoping the water birds. I need lots more practice to find the bird on the water through the telescope. The water is often without obvious clues as to a bird's position. Causing quite a lot of hunting to bring them into view.

Finding birds through any instrument is a slowly developed skill. I have years of practice with binoculars but none with a spotting scope.The advice from the wildlife photography experts on YT suggests practicing [endlessly] on the mundane. Saving the rare sighting for your debut digiscoping masterpiece is very unlikely to be as easy as you hoped.

The sparrow or the mallard duck doesn't care that it is not rare. They all make a valid target for endless practice in framing and focusing and capturing "the moment." The problem with the lake is that it is 70 yards to the middle and twice that to the opposite shore. Perhaps that is really an advantage in accelerating my climb up the steep learning curve.

I am using stronger reading glasses just to see the little Ixus screen. Which makes it impossible to see the distance clearly. For which I need no glasses. Focusing accurately remains an almost random affair. I simply cannot see the degree of focusing sharpness well enough on the tiny, heavily pixelated, Ixus screen. 

My eleven year old Lumix TZ7 is totally unsuitable for digiscoping because of its 12x zoom and long snout. So a new camera is on order to try and lift my skills. I really am unable to make much further progress using the Ixus 117HS as a focusing and framing screen.

Other than learning to point accurately and practiing panning and tracking smoothly. Which is a fine art with such a very long, equivalent focal length. Talking of which: I tried to keep the telescope power and camera zoom down to a minimum this time. Make lots of mistakes but learn from them by constant repetition. Develop the eye and the necessary muscles required for digiscoping.

A lot of anticipation is required to keep the bird centered within the frame. Water birds are rarely still and often carried along by the lightest wind. They suddenly decide to put a spurt on and then just as quickly turn round on the spot. Capturing a "flattering" shot of them is actually very difficult. The ability to do it repeatedly needs careful honing.

Fortunately, most of the costs in digiscoping [locally] are in the purchase of the vital equipment. No expensive film and developing is involved. Nobody counts the digital images piling up on the floor. Every single one of which is a small sacrifice to building experience and skill.

The nearest birds to my nearest shore were the Great Crested Grebes. Sometimes swimming within 30 yards but mostly out in the middle of the lake. One adult and two juveniles. The adult spent most of the time hunting underwater.  Appearing just briefly enough to tempt a quick 'snap' before it vanished again. While the two juveniles paddled up and down the lake, preened or dozed. Their crests are already showing dark tufts on the backs of their heads. Their plumage is also darkening with increasing maturity.

Shelducks, with young, were too distant, at 130 yards to be worth spending too much time on them. Being so pale they reflect in the slightly choppy water. The Ixus has no filter thread. So I cannot use a polarizing filter to reduce the bright reflections.

Mallards were their usual busy selves. With a solitary Coot feeding at the little duck nesting house provided by the lake owner at 180 yards. I took quite a lot of stills and a few videos largely concentrating on the grebes.

A ridiculous number of my stills were out of focus! Conversely, the videos were mostly fine regarding focus but need careful editing to reduce "user errors." Having almost no experience with video editing I must improve my video capture skills instead. Smooooth!

I really need a more sensible arrangement for all the gear I have to carry. Some of which needs to be fitted or removed from the telescope. I am using well laundered socks but they are hardly ideal. The straight Kowa takes up much more room in the Viking Optics tripod carry-system bag than the bent Razor. Neither would allow the eyepiece to be fitted. Fortunately I can use my cycle, saddle bag but the kit really needs better protection and easier identification. Everything used to come in drawstring, vinyl bags in my youth but these aren't so visible these days.

~~

Sunday 14 June 2020

14.06.2020 The Kowa TSN-884

~~


The Kowa shows all the signs of coming from a photographic base. It has proper lens caps and bayonets just like a proper camera lens. 

The quality of the optical coatings is remarkable. The glass literally disappears. The optical quality is superb at all powers. Leaving nothing to be desired.

The overall finish is excellent. As is the overall design and understated, cosmetic values.  The two speed focusing knobs are wonderful to use and completely effortless. I hope they don't bend to copycat fashion, in future designs and go for the full body focusing ring. I have already said how well balanced the power [magnification] ring is on the superb, zoom eyepiece. 

The eyepiece can be fitted and removed without a struggle. With a release button designed for real, human finger tips.  Not tiny hands with hardened finger nails. A red dot is provided to guide the user to correct orientation. So that the power scale is not hidden underneath the instrument once mounted. The magnification text is large enough and clear enough to be easily read without having to find reading glasses. Not carried over from similar models with duplicated text for two ranges of powers! 

The bayonet fitting, rear cap even has special mouldings to provide improved grip under all circumstances. Like having wet or sweaty hands. More careful thought being put into the finished design.

These are all signs of a manufacture which really cares about the whole user experience. Rather than being built down to a price in some anonymous, Chinese factory. To be moved by a chain of "box shifters" masquerading as online shops.

It would be hard to find fault with the Kowa in direct, hands-on contact. It is completely at home in a smart, bricks and mortar shop manned by knowledgeable salespersons. Where the Kowa sells itself on sheer quality and the user experience. With flawless optics free of any suggestion of false colour.

~~


Tuesday 9 June 2020

9.06.2020 Kowa TSN-884 1.25" astro eyepiece adapters & binoviewer.

~~

I purchased the astronomical eyepiece adapters at the same time as the telescope. I have inverted one of them for the photograph to show the details but they are essentially identical. Which seems rather pointless. The thumbscrews make it impossible to screw in the adapter!

The one with the hidden grub screws means that the eyepiece has to be fixed into the adapter first, and the grub screws tightened, before insertion into the telescope. The zoom eyepiece having been removed first to expose the internal thread.

I mention this early in my description of the telescope system because I want to try binoviewing with the superb Kowa optics. Which meant using one of the adapters to hold the binoviewer spigot firmly in place.

These images show how I tested the basic concept using an old, no-name 20mm eyepiece and one of the adapters. I was easily able to reach focus [and well beyond.] While the resulting image was superbly sharp and bright. Providing a power of 25x to match the lowest zoom magnification.


The images on the right right show the result of removing the ring which protects the large male thread intended for digiscoping and also to accept the 1.6x Kowa Extender.

The Extender is a sophisticated form of negative lens [Barlow lens] used to amplify the original telescope [zoom] powers from 25-60x up to 40-96x! Which suggests it may well have astronomical uses as well as to bring in very distant wildlife subjects. More on this subject later when I have had a chance to try it more thoroughly.

Well that was disappointing! Despite using a full compensation [2.6x105mm] T-S, Glass Path Corrector on the nose of the Telescope-Service binoviewers I could not reach distant focus in the Kowa. I screwed the adapter in first and then pushed the binoviewer gently in as far as it wanted to go. It still could not focus much beyond 30'. I was at the full range of the '884s focusing knobs. Odd. I thought it might work. The ordinary astro eyepieces have plenty of inward travel to find distant focus.

Mystery solved: Despite the dealer's claims, the 2.6x GPC is not fully compensating for the binoviewer. I checked on another telescope with lots of room to focus inwards. The T-S GPC is 20mm short of full compensation. Since the binoviewer cannot be physically pushed 20mm inside the Kowa telescope it cannot possibly reach distant focus. The magnification is rather high anyway with the 2.6x GPC.

In late sunshine I had a look at a Blackbird perched on the ridge of a distant roof, at 175 yards, at 96x. Every detail of his glistening plumage was clearly visible. As were the details of his eyes. That is a truly remarkable, optical performance from the Kowa!

~~


9.06.2020 The Kowa TSN-884 88mm 25-60x.

~~


The Kowa TSN-884 is a "straight through" [ST] telescope. Which is an advantage over a "bent" 'scope for digiscoping. Firstly, the camera or smartphone screen won't reflect the sky. 

Nor will there be such a problem pointing it at a subject. As is often the case when transferring a sighting from binocular to 'bent' 'scope to camera.  It takes far more practice to align on a subject without a straight tube to sight along. Though Kowa thoughtfully provides a "gun sight" on the retractable and rotatable sun/dewshield.

The 'bent' design is often more comfortable to use and better suits people of different heights. They just have to stoop over, more or less, to look through the eyepiece. 

The "ST" 'scope would require major changes in height of tripod for different users. Or risk painful [bent] knees or standing on tip-toe. The ST also requires a much taller tripod for most users. Which means you are a more easily spotted as a dangerous human in the eyes of your shy quarry. A bent 'scope provides a lower user profile and is [arguably] less obviously human.

You might even have to raise the central pillar to make the tripod tall enough. Which risks increased vibration with a powerful telescope. Best to have a tripod which is tall enough by leg extension alone.

The Kowa enjoys a good quality stay-on case [fitted bag] in heavy nylon to provide some protection from the weather and light knocks. Once the case is fitted it is probably less visible from a distance than the 'naked' telescope. It certainly looks suitably business-like when the '884 is perched on the tripod while fully clothed.

The delightful 2-speed focuser is provided with a cover patch. While a "nose bag" protects the eyepiece. Being attached by two lanyards with Q/R buckles to the carrying trap and several poppers for extra security. All very well thought out.

My only criticisms, so far, relates to "the fitted bag." I really can't see how it becomes a "case". Which, one would assume, refers to a stiff box.  Rather than cloth.

The tripod aperture [in the bottom of the stay-on bag] has a permanently attached cover with Velcro on only one side. When the cover patch will never be used once the 'scope is permanently attached to a tripod plate. The dangling flap only gets in the way because it hangs down precisely where one wants to mount the telescope on the tripod.

I shall probably unpick the stitching of the tripod aperture patch and put it "somewhere safe." In fact it took me all of 30 seconds to remove the flap using a stitch picker. Leaving not a trace of its having ever been there. Now the patch/flap can no longer get in the way when mounting the telescope on the tripod head.  Furthermore, the patch/flap no longer blocks access to the friction knob on the '500 head.

Meanwhile, the focus knob "patch" cover [on the top] is fully removable and has Velcro strips on either side. Presumably to allow free access to left or right handed users. Might a lanyard have avoided loss of the focuser patch in the wilds?  I can slip it into the tripod carry bag. Ready for immediate use should the weather change.

The cloth cap over the objective [the large front lens] is zipped and covers the plastic, protective plate [or the bare lens.] I expect the cap will become more floppy with time. Though I would really have preferred the cap was fully detachable. Or less well attached.

A popper is provided to hold the cap back but this is very oddly fixed off-centre. Causing the circular, cloth cap to be twisted very awkwardly when hanging down. It also makes it very difficult to find and close the popper. A very odd arrangement. Completely out of keeping with every other detail so far.

A bit 'clumsy' for my tastes. So I shall probably just leave the cap dangling down when using the telescope. The zip running round the cap is very smooth in action.  I had imagined it might be a struggle but it really isn't. A pleasant touch of thoughtful quality.

I shall consult The Head Seamstress of The Household to see how the cloth cap might become removable. [Or not, as the case may be.] The expert opinion was that it would require a new, open-ended zip. Plus lots of fiddling to allow complete removal and easy remounting of the cloth cap. Best avoided.

So I will leave it well alone and let the cloth cap hang free when it is not closed. Though I may well remove the ugly white label inside the cap which makes it look very untidy. At this level of expenditure and manufacturing quality one expects these small details to be properly attended to. Even a coloured cloth label woud have helped. White simply jars the senses. Otherwise, I really like the stay-on bag for its overall neatness, excellent finish and functionality.


~~